JP’s Website · 2024-11-22 · My new POWER Indigo 2

JP’s Website
Posted on 2024-11-22
On Mastodon, I recently came across a post by Kestral, with a link to their website:
I find myself with significantly less time than I’d like to work on restoring all of these devices, so my hope is that folk in the community will take some off my hands, lovingly restore, and help to keep computer history alive. Get in touch with me in the Fediverse if anything here sparks joy.
Oooh, me me me!
After exchanging a few messages, we arranged to meet at the Centre for Computing History, which happened to be hosting the annual Retro Computer Festival. I covered the cost of entry to the museum, and in exchange I received two things. One of which we’re going to talk about here, and the other I’ll talk about later.
I am incredibly grateful to Kestral for the opportunity to enjoy these extraordinary pieces of technology. Thank you!
But you know what this one is, because you read the title.
(Click any image for a large version)
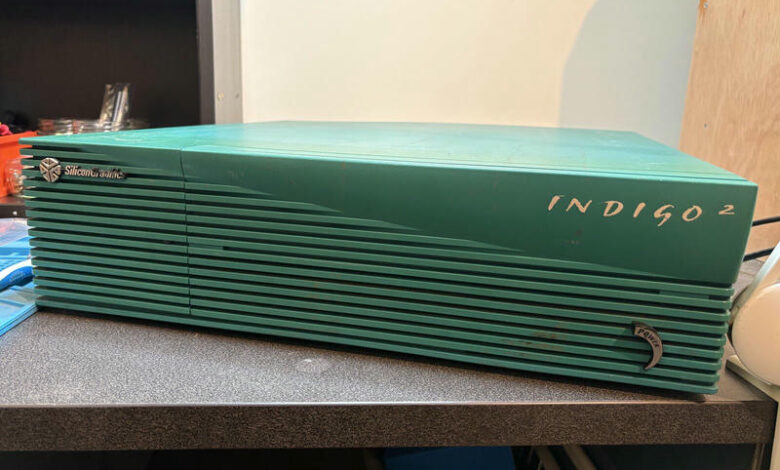
This is a Silicon Graphics workstation from 1995. Specifically, it is an ‘Teal’ Indigo 2 (as opposed to a ‘Purple’ Indigo 2, which came later). Ordinarily that’s rare enough – these things were about £30,000 brand new. A close look at the case badge though, marks this out as a ‘Teal’ POWER Indigo 2 – where instead of the usual MIPS R4600 or R4400SC CPU modules, we have the rare, unusual, expensive and short-lived MIPS R8000 module.
But first, let’s open it.
Flaps down to view the drives. We haven’t got any. That pained squeak you can hear is coming from my wallet.
This panel comes off.
Pop the catches and up comes the lid.
Yeah, definitely no drives. Just some dust.
At this point, I have no idea if the POWER Indigo 2 works, and if it doesn’t, what it might take to make it work. They say there’s nothing in life as expensive as a cheap Jaguar. Well, a cheap Silicon Graphics workstation is right up there.
It’s a very well engineered case design. I mean, it should be for the price. I can see three spaces for slotting in what I assume at this point at SCSI drives (they are) fitted to some kind of disk sled I don’t have (and which turn out to be quite expensive). There’s a flat flex cable joining the various drive bays, and it looks incredibly easy to damage. Over on the left is some kind of expansion bay. I cannot see the CPU or the RAM at this point.
Ah, there are the RAM slots – in the centre at the back. There is no RAM, which is a problem. We’ll come back to that.
The graphics card is enormous. This is the Silicon Graphics ‘Express’ series ‘XZ’ graphics card, which is mid-range option for a ‘Teal’ Indigo 2. The lower-end card was the ‘XL24’, which took one slot. The high-end card was the ‘Extreme’ which took three slots. This XZ just takes two slots, as we’ll see in a moment.
Close ups of the chips on the VB2 – the uppermost board in an XZ.
Just to confuse things, there were actually two graphics cards from SGI called ‘XZ’ – one with two Geometry Engines and one with four Geometry Engines. Why SGI decided to upgrade the card without renaming it I don’t know. This is the later four-GE version, which is also known as ‘Elan’ after the high-end card that shipped in the earlier “Indigo”. But this isn’t an Elan, it’s a four-GE XZ, because it’s from an Indigo 2. This guide to ‘Express’ graphics explains it all.
The GR5 board, with its four Geometry Engines, is underneath. They are connected with a large (and dusty) inter-board connector. They connect to the expansion board riser using SGI’s proprietary GIO64 bus, the connectors for which sit in parallel with EISA bus slots for slower cards.
This is the back of the GR5 board.
Some better shots of the expansion riser.
The inside of a drive bay has this weird almost-but-not-quite SCA connector. It carries 10 MB/sec Fast SCSI-2, which was cooking for 1993 when this chassis was first introduced. You need a ‘sled’ go in here, which holds a standard 50-pin Fast SCSI drive and adapts the drives connectors to something that fits here.
This is the back of the sled.
Now here’s the CPU module, with a curious warning screwed on.
It reads:
WHEN INSTALLING R8000 MODULE
IT IS CRITICLE (sic) THAT ALL MFG
SCREWS ARE INSTALLED AS THEY
PROVIDE PWR AND GND!MEMORY SIMMS THAT EXCEED 1.26
INCHES IN HEIGHT MAY NOT BE INSTALLED UNDER R8000 MODULE!
Let’s unscrew the very important power delivery screws and flip the module up.
The R8000 is not a CPU in the traditional sense. It is a processor, but that processor is comprised of many individual chips, some of which you can see and some of which are hidden under the heatsink.
The MIPS R8000 was apparently an attempt to wrestle back the Floating-Point crown from rivals. Some accounts report that at 75 MHz, it has around ten times the double-precision floating point throughput of an equivalent Pentium. However, code had to be specially optimised to take best advantage of it and most code wasn’t. It lasted on the market for around 18 months, before bring replaced by the MIPS R10K in the ‘Purple’ Indigo 2.
Based on some Swiss price lists I found, a 64MB POWER Indigo 2 with XZ Graphics and a 2GB SCSI drive would run you around £58,000. I hope the first owner felt they got their money’s worth. Some 30 years later, I know I did.
Now the CPU card is out of the way, we can see the chipset underneath and those final two RAM slots. Definitely empty.
The ribbon looks delicate. Let’s not flip this incredibly rare CPU module up out of the way very often.
Does it boot though? Well to find out I needed to order some RAM and a 13W3-to-VGA adapter. The lovely people at SGI Depot hooked me up, and I only had to wait a day or so for delivery. I am very impressed with the service, and Ian was kind enough to chat over e-mail about exactly what I had here, and what I might need to get it running.
I found this Personal Computer World archive online. Referring to the June 1995 issue and page 286, we can see Power Mark selling “MEMORY for SILICON GRAPHICS Workstations“. A 64MB RAM kit for an Indigo (which like my Indigo 2 took standard 72-pin parity SIMMs) came in at £1,999. That amount of money was enough to buy a Dan Technologies Pentium 100 machine with 16MB RAM, 1GB HDD and a 14” monitor.
But does it boot?
First I pulled the PSU plugs from the mainboard and tested it in isolation. It wasn’t regulating 12V terribly well, but the 5V was about right, and it was at least not putting out 12V (or 230V) on the 5V rail, so I figured it was safe to plugin.
I livestreamed, this process, which you can see here:
You can see the picture below already – of course it boots. These things were build like tanks. At 10:03 we do the first power-on and you can hear the lovely chime sound. Very elegant.
This is my Dell 1908FP 19″ TFT, which has a native resolution of 1280×1024. This is fortuitous, because the SGI puts out a native resolution of 1280×1024. I think you can change the NVRAM settings to make it run at a lower resolution, but I think my NVRAM battery is flat and this is the default. I didn’t know at the time that the 1908FP accepted Sync-On-Green video, so I’m running it though my orange McBazel OSSC. Shortly after these pictures were taken, the OSSC output started flashing up black. The unit then expired entirely and refused to boot or show anything on its LCD.
The options on the boot screen are:
- Start System
- Install System Software
- Run Diagnostics
- Recover System
- Enter Command Monitor
- Select Keyboard Layout
You thought your UEFI BIOS was fancy with its bitmap display and mouse input? Silicon Graphics were doing this in the early 1990s.
In this next image we’re looking at the installer for IRIX 6.2, which I’ve booted off my BlueSCSI.
To install IRIX 6.2 onto a blank hard drive you have to:
- Boot into the SASH shell, with
boot -f dksc(1, 5, 8)sash64 - Boot from SASH into the stand-alone partition tool with
boot -f dksc(1, 5, 7)/stand/fx64 - Put the partition tool into ‘extended’ mode, and then auto-initialise the drive. This will run a complete bad-block sweep and lay down an SGI disk label – their equivalent of an MS-DOS partition table.
Here is the IRIX 6.2 “Magic Desktop”. I’m setting up SoftWindows Version 2.0, which was shipped with the OS. It’s automatically installing Windows 3.1 for me, which seems to be bundled with SoftWindows, although you do need to find a licence key to make it work.
I made some art, using “IRIS Showcase”. Quite a nice vector graphics package, it reminds of of Acorn’s !Draw. But better. And with 3D shapes. And ‘Gizmos’ (which are non-modal dialogs you can leave open, like Lotus SmartSuite tried to claim was so novel several years later).
That’s it for now! I bought a sled, so now IRIX is installed on a real 4GB SCSI Quantum Fireball HDD … whilst it lasts, anyway. The machine hasn’t crashed once so far, and Magic Desktop is a real joy to use. I’ve even been FTP’ing things over from my main machine, although IRIX 6.2 can’t mount loop-back images so actually most software is installed by dropping an ISO onto the BlueSCSI’s SD Card and then mounting that inside IRIX, just like I did with the OS install images.
I like this machine a lot.
Further Reading:


